
March 25, 2013
Creating Rumpus event notices that go to a particular person is pretty straightforward; you just enter the recipient's e-mail address in the "Mail To" field of the notice. By defining a notice for each person in your organization, you can have those people notified when a particular user uploads or downloads a file, or when other actions occur. But there are times when a single notice is used to send notification e-mails to different people. For example...
Drop Ship "Picked Up" and File Request "File Uploaded" Messages
Be sure to enter each user's e-mail address on the "User Info" tab of the "Define Users" window. When Rumpus knows each user's e-mail address, it will automatically address drop ship and file request notifications accordingly.
Drop shipping configuration includes the option of selecting an event notice to be triggered when drop ship URLs are accessed. Define an event notice to be used when drop ship file recipients download a file, then select that notice as the "Picked Up Notice". When you create the notice, supply your own e-mail address as the "Mail To" address, to make testing the notice easy. When recipients pick up drop shipped files, Rumpus will automatically address the notice to the person who originally sent the file.
Similarly, you can create a notice to be used when users upload files using a file request URL and Rumpus will automatically send the message to the person who sent the file request.
If you, or someone else, should also receive notification for either drop ship file downloads or file request file uploads, enter the address in the "CC" field of the event notice. Rumpus will correctly re-assign the "Mail To" field, but the "CC" field specified on the notice will be applied as entered, allowing you to receive a copy of every notice, if you wish.
End-User Selectable Recipients
Whether it's a regular user with a Rumpus user account or a guest user sending a file via the drop box, setting up Rumpus to offer a selection of people to notify is not difficult.
By way of example, let's assume that you have 4 sales representatives in your organization: Bob, Mary, Tim and Zach. You've set up the drop box to make it easy for clients to upload files, but need to allow those clients to specify who their sales rep is, and then have that rep receive an e-mail when new files are uploaded via the drop box.
Set Up The Menu
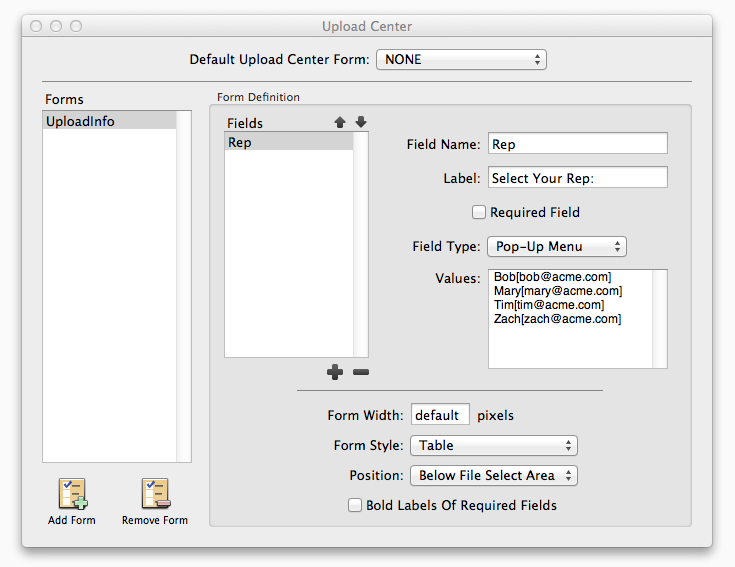
The first step is to create an upload center form with a pop-up menu for the sales reps, as shown here:

The interesting part of this form is the pop-up menu values box. It lists the sales reps, one on each line, with the rep name and e-mail address. The e-mail address is offset by square brackets, which tells Rumpus to display the rep name in the menu displayed to end users but send the e-mail address as the field value when the form is processed. In this case, for example, the first item shown in the form will be "Bob", and when the form is submitted with that rep selected, the address "bob@acme.com" will be the field value.
If you like, you can add other fields to the form to prompt end users for additional information about the file being uploaded.
Set Up The Notice
Create an event notice just like any other, and to start, enter your own e-mail address as the "Mail To" address. Test the notice to make sure you get the message as you'd like it.
On the custom message body sheet, there is a pop-up menu function to insert tokens for filename, file size, and other variables. There is no "insert token" function on the main event notice setup window, but the tokens work as advertised in the "Subject", "Mail To" and other fields nevertheless.
To have the selected sales rep receive the e-mailed notice, assign the "Mail To" field the token "<FORMVAR variableName>". In the upload center form, the field we created was named "Rep", so the "Mail To" field will be set exactly as "<FORMVAR Rep>".
Select the Form and Notice
All that's left is to select the upload center form and event notice for use. Since our example involves setting the system up for the drop box, access the drop box settings and select the "Upload Center Form" and "Event Notice 1" fields accordingly. The same form and notice combination could just as easily be applied to a user account, drop ship pickup form, file request file upload form, and more.