

May 10, 2022
Gmail is not only the most commonly used mail service on the Internet, it's also available to just about everyone, so it makes a great test service. Whether you need to use Gmail as your primary mail service or just want to set up an easy test of Rumpus' mail sending capabilities, it's worthwhile to take a look at a sample setup.
Important! Rumpus will be interfacing with your Gmail account as a "3rd party application", so the necessary first step is to tell Google about your use of Rumpus. This process is fairly simple and is described below, but we need to point out that Maxum can't provide comprehensive support for Google accounts or products. In particular, Google may change how accounts are managed in the future. Please contact us at support@maxum.com if you have problems or suggestions with respect to the process described below.
To set up Rumpus as an application that can send mail through your Gmail account, first log into your Google account. Next, select the "Security" panel and scroll down to the "App passwords" option. (Make sure 2-Factor Verification is enabled, as it is required to generate app passwords.) Choose the "App passwords" option to open the app password setup function. If there is no "App Passwords" configuration option shown, click "Search Google Account" and search for "App Passwords", which should take you to the App Passwords configuration page. You may be prompted to supply your account password, which you can enter to continue.
A list of app passwords will be shown (or may be empty), and new app passwords can be generated in the section just below the list. From the "Select app" menu, choose "Mail", and from the "Select device" menu choose "Mac" or "Windows Computer" depending on your server platform, then click "Generate". If all goes well, you should be presented with a 16 digit password as shown below.
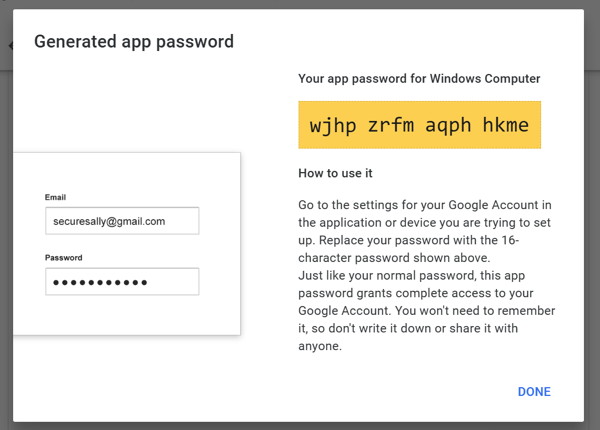
Keep that window open and handy while you set up your Rumpus SMTP access, or copy and paste the app password shown so that it is ready for use momentarily.
Now you are ready to set up SMTP access in Rumpus. Open the Network Settings window and flip to the "E-Mail" tab.
For Gmail, the Server Address will be set to "smtp.gmail.com" and the Port will be "587". Also, be sure to enable the "Use TLS (Secure Mail)" option and leave the extended greeting option enabled. The Username must be set to the Gmail account mail address, then copy/paste the app password generated above into the Password field. The "Administrator E-Mail" address will be your mail address, which may or may not be the same as the Gmail account used to send mail.
Here's an example setup, as configured on the Network Settings window in Rumpus:

The "Send A Test Message" button is really handy, and its result window is very accurate. If the test result indicates that the mail was successfully sent, you can be sure that it was. If the message fails to come through, check your spam filter and you'll almost certainly find it. If an error is indicated, read the message carefully... It almost always specifically identifies the problem.
When you create new Event Notices, the E-Mail settings defined on the Network Settings window will be used as default values, making notice creation easy. Notice that the Event Notices window offers similar SMTP options, but lacks "Use TLS" option as it automatically applies to all Event Notices.
As always, if you have trouble, send mail to support@maxum.com. Be sure to include details, especially the entire test e-mail result message, which is always the best way to diagnose mail problems.