

November 16, 2021
The process of recognizing SSL certificates as "trusted" requires a trust chain that links a certificate back to a "root certificate" that is pre-installed on the client computer. In other words, all browsers that access SSL-encrypted Web sites trust the site certificate because the client computer comes out of the box with a set of top-level "root" certificates. This allows the browser to automatically trust any certificate that chains back to one of those known root certificates.
This certificate chain of authority keeps things safe and trusted, but comes with a downside. If a client computer does not have a complete set of up to date root certificates, then Web sites that chain back to a missing root certificate will not be trusted. This issue came to the fore in Fall 2021, when the root certificate that was long used by Let's Encrypt expired. Of course, the Let's Encrypt service updated their certificate to a new root certificate, but that certificate is not installed on many older Macs.
In order for older Macs to automatically trust modern Let's Encrypt services and certificates, the newer Let's Encrypt root certificate needs to be installed on the Mac. Adding the new cert solves 2 problems. The first is a trust failure when using Let's Encrypt on a Rumpus server to generate an LE cert. The second is to allow older Macs to automatically trust any certificate issued through the Let's Encrypt service.
There are several good articles on the Web with a complete discussion of what changed and the details of the issue, including:
Installing the new LE root certificate on an older Mac is fairly simple and takes just a few minutes. Here's how:
Step 1a: Download the needed certificate, "isrgrootx1.pem", directly using this link:
Step 1b: OR if that link fails for any reason, visit the "Chain of Trust" page on the Let's Encrypt Web site and download the link from there:
Step 2: Find the "isrgrootx1" certificate in your Downloads folder and double-click to add it to your Keychain.
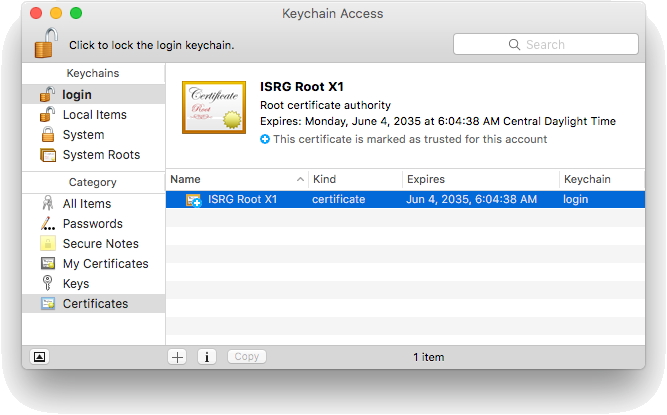
Step 3: In Keychain Access, select the Certificates View to find the newly added cert, as shown here:

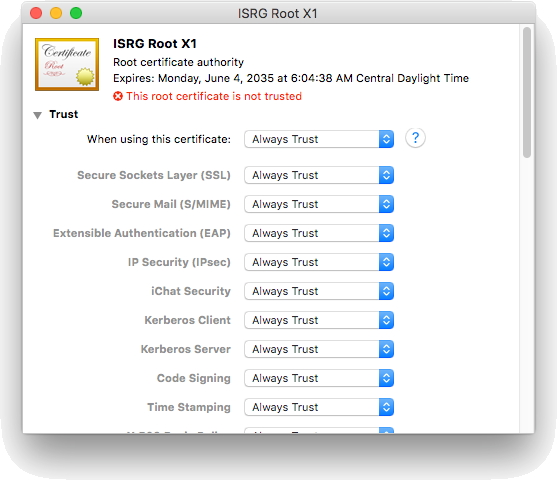
Step 4: Notice that the cert is marked as not trusted. Double-click the cert to open the trust options.
Step 5: Click the "Trust" triangle to edit the trust settings. From the "When using this certificate" option, choose "Always Trust", which auto-sets all of the other trust settings, as shown here:
Step 6: Close the window and supply the system admin password as needed to save the change. Notice the change to the trust status of the certificate:
Step 7: Quit Keychain Access and open Safari, then browse to the Let's Encrypt Web site to confirm that it is now automatically trusted by the browser.
Step 8: To ensure that Rumpus resets with the updated root certificate, click "Stop Server", then quit the Rumpus application, relaunch, and click "Start Server".
Once the older Mac trusts the Let's Encrypt HTTPS site, Rumpus will be able to communicate with the Let's Encrypt service in order to perform LE actions like account creation and certificate issuance.
As always, please contact us at support@maxum.com if you have questions or require additional support.