

September 21, 2012
Event Notices make it easy to have people notified when an external user uploads a file, but often, the person who gets the notification e-mail needs quick and easy access to that file. Local users might have the Rumpus server mounted on their desktop for easy access, or they might use FileWatch, which provides drag & drop downloads of recent files, but it's also possible to include a download link right in the Event Notice e-mail. The person who is notified that the file has been uploaded can then copy the file to their own desktop just by clicking the link.
This technique is particularly useful for files uploaded via File Request. In this case, a local user sends a File Request to anyone, anywhere. That person clicks a link in the File Request e-mail, is presented with a simple file upload page, selects the file and uploads it. When the upload completes, the original local user gets an e-mail notifying them that the requested file has been sent, and can then access that file with a single click.
In Rumpus, open the Define Users window and create a new user account. Make the account name "LocalPickup" or something like that, and assign a random password (or let Rumpus generate a random password for you). Set the "LocalPickup" account Home Folder to "ROOT", so that it can be used to access files anywhere Rumpus users can upload files into. Next, diable all privileges for the user account, except "Permit Login" and "Download Files". This account is going to be shared by multiple people and the password is going to be plainly visible, so it's important to limit it's access. With only the ability to log in and download files, even if the account is discovered by a potential hacker, it can't be used to put content on the server or even see what files are on the server.
Create an Event Notice to send an e-mail message to the local user who needs to be notified of the file upload. (If this setup is for use by multiple people using File Requests, just set yourself as the "Mail To" recipient. See "Step 4" for details.) Your message body might look like this:
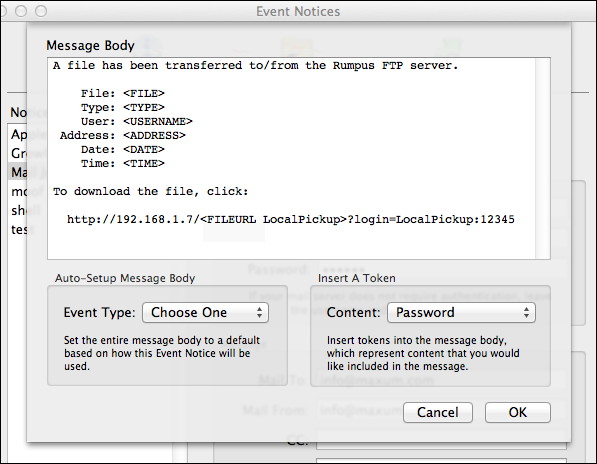
The important part of this is the pickup line at the end. It has to be exactly right, so that the URL will correctly download the file.
In place of "192.168.1.7" in the URL shown, enter the address or name of your server. If users will be accessing the file on the local network, it's best to use the local address of the server.
In the "FILEURL" token, you need to specify the name of the pickup user account created in step 1, so that Rumpus automatically makes the pickup URL correct for that account's Home Folder. In other words, regardless of the user account used to upload the file, or where the file is placed, by making the URL relative to the "LocalPickup" account Home Folder, our link will work as expected.
Finally, we're using an "Auto-Login URL" to bypass the usual Rumpus login page and allowing direct access to the file. After the "login=" portion of the URL, include the pickup user account name and password, separated by a colon. (In the example, the account password is "12345".)
This one is easy. Open the Web Settings window, flip to the "Options" tab and turn on "Enable Auto-Login Downloads". This will cause the file to be downloaded to the local user's computer when they click the link, instead of having the file merely displayed in the browser window.
Set up the notice to be triggered normally. You might select the notice for certain user accounts by choosing it from the "Trigger Upload Notice" menu on the Define Users window. Or, you might set the notice to be sent when a file is uploaded to a particular folder using a Folder Trigger.
If the purpose is to allow easy access to files uploaded via File Request, then select the notice as the "Uploaded Notice" in the "File Requests" box on the "Guests" tab of the Web Settings window. Note that Rumpus will automatically set the "Mail To" address of the message to the original person who sent the File Request. That is, even though the "Mail To" address on the notice might be your own e-mail address, Rumpus will automatically address the message to the right person, over-riding your own e-mail address with that of the correct local user.
That will do it. Now, when users receive a notice that a file has been uploaded to the server, they can download it to their own computer with a single click. As always, send an e-mail to "support@maxum.com" if you have any trouble at all.